Creating a Simple Water Shader using Shadergraph for Unity
Published
Water is a fascinating topic in Computer Graphics, since you can reach great levels of complexity by implementing reflections, wave simulations and other systems.
In this article, we’ll provide an explanation and an implementation for the basic blocks of creating a water shader and, while we’ll be using Shadergraph and Unity, I want to make this a nice starting point and a great refresher for everyone. So, let’s get started! (Note: this shader was made using Unity 2019.4.11 and URP 7.3.1).
The Main Components of a Water Shader
Our shader will focus on 2 elements, to create a simple water shader and help you understand how this all works.
- Depth Color
Water usually is usually clear on top and gets more opaque the deeper the ground goes compared to the level of the water surface (except if, like me, you live near the English Channel where the sea is just completely opaque). - Movement
Water is rarely still and while complex ocean simulations are not within the scope of this article, there is some simple, but cool and efficient stuff to be done with normal maps.
When writing this article, I had the ocean and islands in mind, but these parameters can be adjusted to fit the environment you want!
So, let’s start by creating a new shadergraph (Shader > PBR Graph), which we’ll call WaterShader, and a new material called SeaMaterial to which we’ll assign this shader. Once this is done, open the shadergraph and set the surface as transparent. Now, it’s time to set up all our nodes!
Depth Color
As we explained in the previous section, water is clearer where it’s shallow, and darker/murkier/more opaque where it’s deep. So the obvious solution here is to choose a color for shallows, another one for the deeper parts and lerp (make a weighted average) of the 2 colors, depending on the depth at a given position.
First, we’ll need to compute that distance. This can be done easily with the following setup:
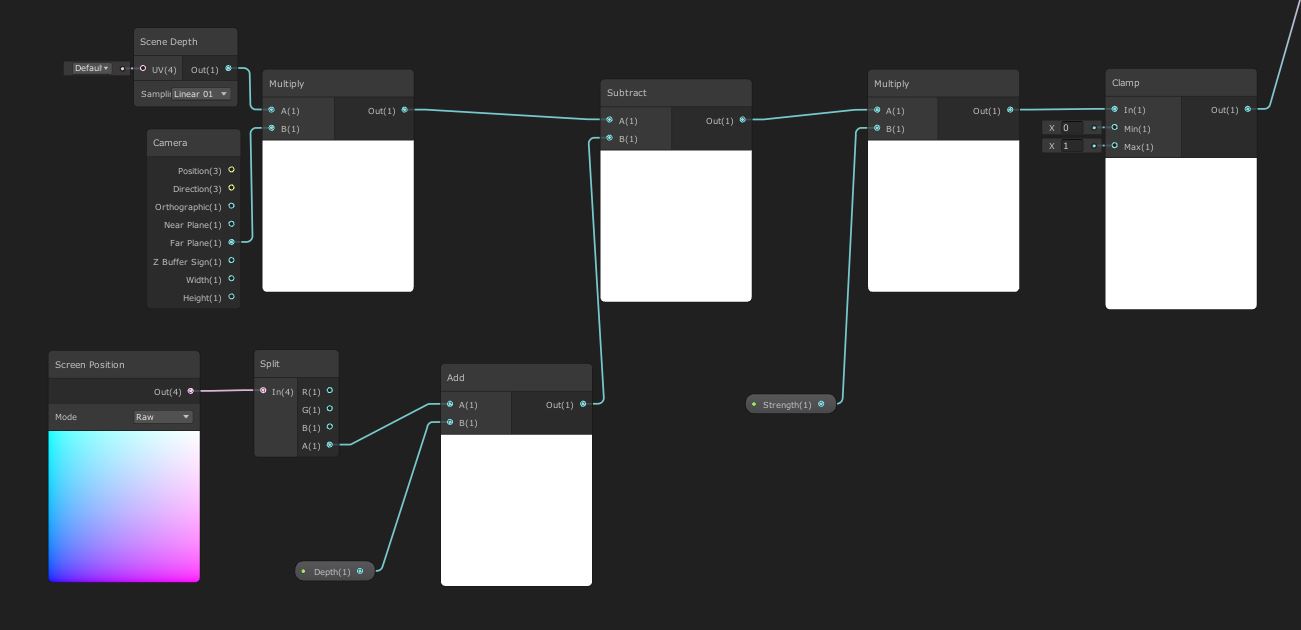
What’s happening here?
- The Scene Depth Node, when set on Linear01 for sampling, gives us the linear depth value between 0 and 1
- The Camera Node (obviously) gives information on our camera. In this case we are getting the distance to the far plane, aka the clipping distance.
- Screen Position returns the position of an object. By using Raw coordinates, the w value (the 4th value of the vector4) will be the world-space depth of the current pixel being drawn.
Basically, the whole setup of multiplying scene depth by the far plane value, and then substracting the world-space depth, allows the shader to get object depth information, based on the distance between the objects.
The Depth and Strength values that can be seen on the previous image are Vector1 and, while not strictly necessary, will help us control the boundaries between shallow and deep water.
Now that we have our access to our depth information, it’s time to add some color to our sea! Start by adding 2 color properties to your shader, and feed them plus the depth information into a lerp node.
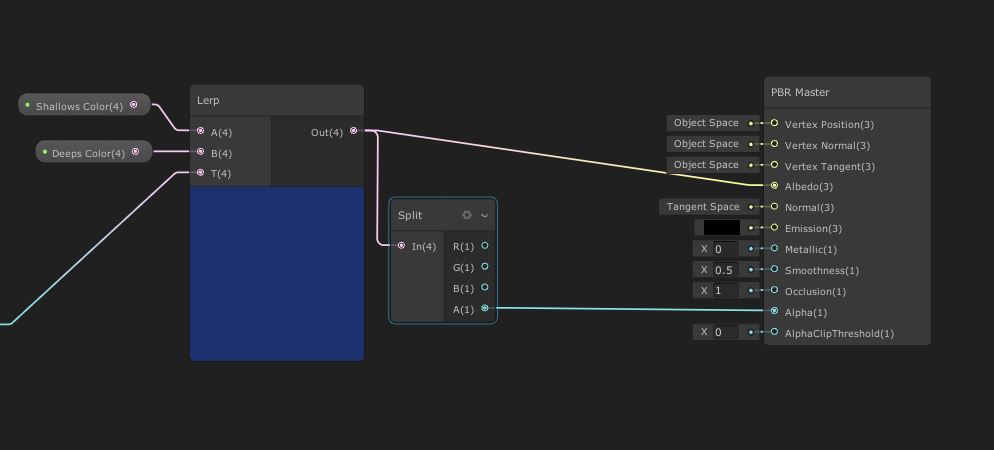
This part is pretty simple: we lerp (make an average) between the 2 colors, depending on our depth. Then we set the albedo and the transparency to the master node. Once again, make sure that you set your shader as a transparent surface shader (in the properties of your master node). Once this is done, voila! You’re free to play around with the colors, as well as the strength and depth properties of your shader until you get a setup you like.
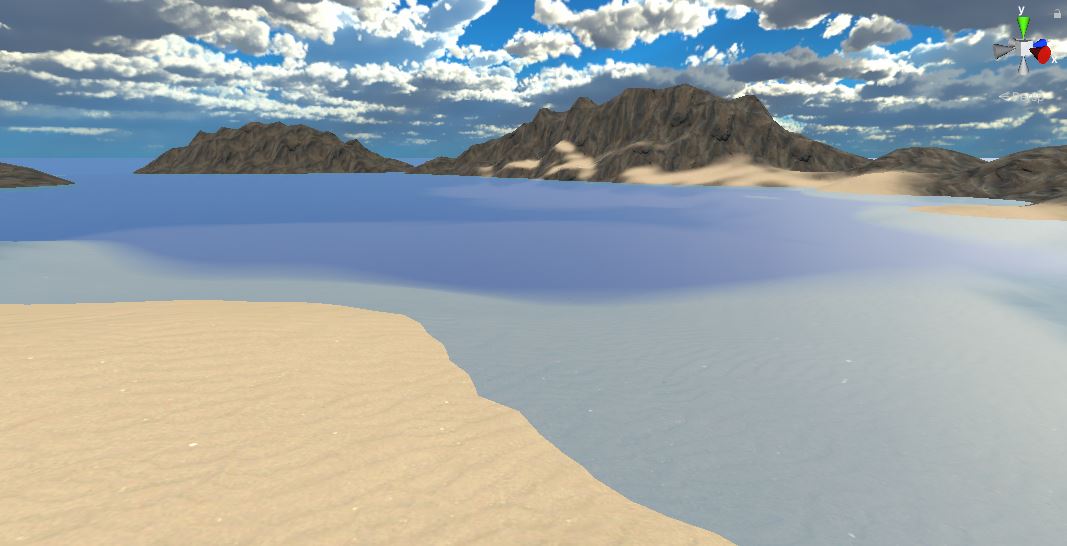
I created a really basic scene by creating some elevation using the Terrain system, painting some textures and adding a free skybox. It’s not much, but I think we’re already starting to get a nice atmosphere going here.
As a little extra, add another property called Smoothness in your Shader, and directly feed it to the Smoothness property of your master node. This smoothness parameter will allow us to control the water’s reflection. Set it as a slider between 0 and 1.

Now then, this is all nice, but this sea is waaaaay too calm. Let’s add some movement shall we?
Movement
It is computationally expensive to simulate a complete wave system, but we can give the illusion of movement by using a scrolling Normal Map. A normal map is a texture containing information to simulate surface details (basically it contains surface angles information). Using it, we are faking movement by scrolling the texture, which changes the way the light is reflected on the surface. If you are unfamiliar with normal maps and bump maps, Unity has a great article on the topic.
In our shader, we’ll add a property to sample a normal map, and we’ll scroll it with time to give an impression of movement to our water.
Actually, we’ll even use 2, going in different directions! This will help make it look more dynamic. The setup in the shader is pretty simple:
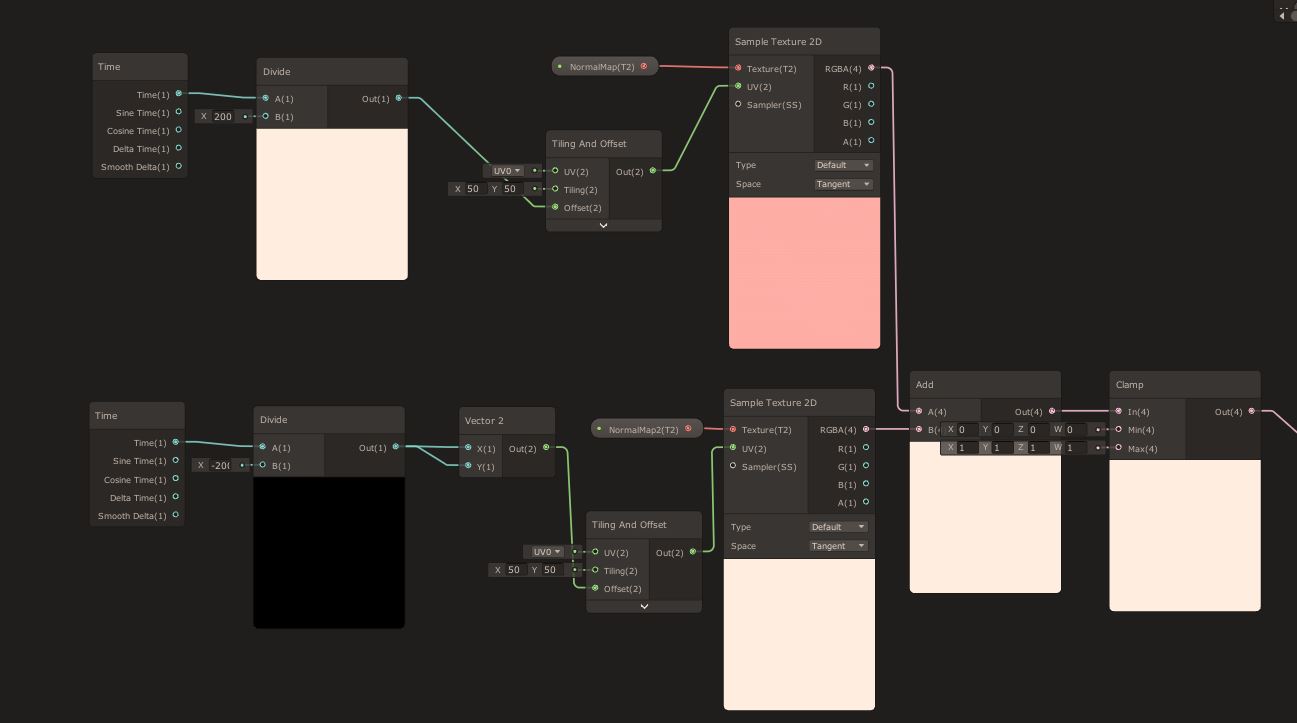
We simply add the 2 normal maps together, clamp the result and link it to the Normal property of the Master Node.
For easier control, I advise you to expose the tiling property for your tiling and offset nodes, and also expose a value to control time. I’ve been using Time divided by a value, but in my opinion it’s better to set up a multiply node with a slider between minus one and plus one.
This looks a lot more dynamic already! Of course it’s also possible to add controls to the strength of your normals, or even use a bump map to simulate waves, but we’ll keep our shader as is for now.
Going Further
That’s it for our quick introduction to creating a water shader, hope it serves as a nice foundation for your own work. There a quite a few ways to improve on this, such as implementing a wave system or adding foam, but that’s for another time.
For now here are some links to help you make a more convincing/stylish water shader: