Change a Sprite according to the Camera's Direction and Position in Unity Shadergraph
Published
Many games use a 3D engine for their graphics, but many more make use of sprites and it can create some interesting atmospheres, such as what was done in Octopath Traveller.
There are a few problems with using sprites or tilemaps in a 2.5D game though:
- Sprites are always facing the same direction. If we are rendering them on quads, this means they become invisible if we look at them from the side. This can be good for Paper Mario but you might want to avoid it.
- When rendering on a Quad, the same texture will be rendered on both sides, which is a bit upsetting.
Thankfully there are ways around that, as shown in the video below, was shared by shaded_technology on Reddit:
Paying attention to the video we realize there are 2 effects at work here.
The first one is billboarding, an effect by which a quad is rotated to always be facing in the same direction as the Camera. Here’s the wiktionary definition link.
The second one is that we can see the rendered sprite changing depending on where the camera is located. This means that if the character is facing a direction (say, North) and we are looking at it from the front, we’ll see its front. But, if we are looking at it from the south, the face rendered will be the back.
Note: This whole process is extremely similar to using impostors in your game. If you don’t know what impostors are (and even if you do), I recommend you read this great article: https://shaderbits.com/blog/octahedral-impostors/
Billboarding is a common technique, but the second effect is a bit more complex. In this article, we’ll be using our shader to set the proper sprite but you could potentially let the CPU do the work.
While using the GPU will give you a massive increase in performance, it is indeed trickier to implement: while we’ll be using static sprites, a more complex setup will have to take into account moving sprites, changing directions (how to handle the character turning right) and other poses. The complexity of the shader will be directly dependent on the complexity of the actions your character can do but the upside is massive scalability. It’s possible you might want to use this approach for background characters and the environment while using a CPU-approach for your main characters to get the best of both worlds.
Anyways, after this introduction let’s get started implementing these effects in Shadergraph! We’ll be using Universal Rendering Pipeline (URP) 10.2.2 and Shadergraph 10.2.2, but it should work with earlier and later versions with no issues, and you could also easily port it to the High Definition Rendering Pipeline (HDRP) easily.
Implementation
I’ll skip the billboard part, as I already wrote about it in this article: /unity-billboard-shader-shadergraph/
And instead I’ll focus on the character rotation part.
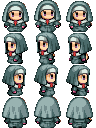
First, we’ll need a tileset/tilemap of sprites such as this one, which you can get on itch.
And now to Shadergraph we go!
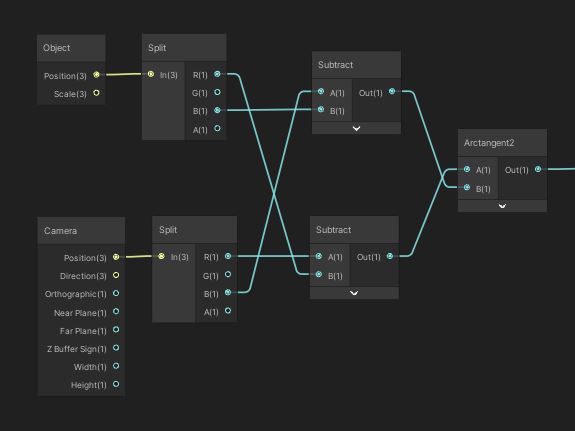
To handle our problem, we’ll consider our camera as rotating in a circle around the target object. While this is not true, doing this allows us to easily compute an angle between our camera and the target object using the atan2 function.

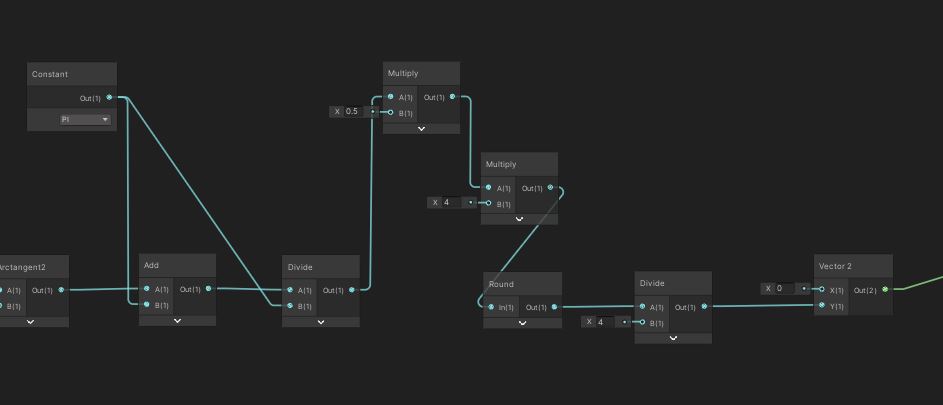
The output of the atan2 function is contained in the interval [-π, π], so we’ll rescale it to be within [0, 1] instead for simpler use.
Now, let’s take a look at our spritemap. For this article we are only implementing non-moving sprites, so we’ll be offsetting the y coordinates of the UV to get the sprite we want on the first column of the spritemap.
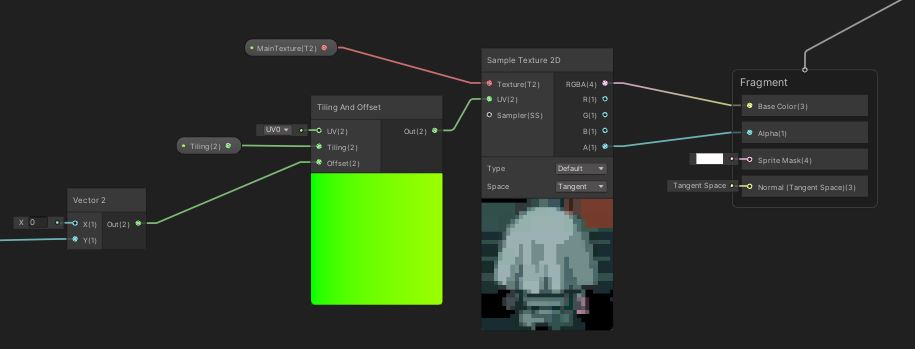
How do we do this? Considering we have 4 sprites, we can take the angle we normalized between 0 and 1, multiply it by 4, round it, and then divide by 4: this will transform our continuous angle into a discreet offset. Now, we’ll only need to plug this value into the offset value of a “Tiling and Offset” node, sample the texture, and we’re done!
The whole setup looks like this:
And you’re done! Let’s take a look at the result (I also added a small healthbar):
Well, actually not, I just rescaled and discretized the angle directly and paid no attention to actual positionning: the sprite changes with angles changes, but I have not implemented the selection of the actual sprite. Considering the spritemaps are not always laid out in the same order, I’ll try to implement a system to handle this, potentially by rewriting this shader in actual shader code and using a C# script to set data, for ease of customisation.
I’d also like to handle “main” sprite selection by checking the forward of the object in shadergraph: with this, it should be possible to select the appropriate sprites for moving elements purely on GPU. Stay tuned for a big demo scene, hopefully soon!
I put the current shadergraph file on github, feel free to check it out!
UPDATE: I implemented accurate sprite selection based on camera position, as well as forward-direction checks: sprite selection is not completely done in shader. The follow-up article is available here!