Change a Sprite according to the Camera's Direction and Position in Unity Shadergraph - Part 2
Published
The first part can be found here: /sprite-change-camera-direction-2/
In the previous part, we created a shader that implements billboarding, but also selects a sprite from a given tilesheet depending on the camera position relative to the gameobject and in this article I’ll just do a quick follow up.
One of the problems of the previous article was that while we did implement changing the sprite depending on camera position relative to the gameobject, we did not map it correctly. I realized that since different tilesets are not necessarily ordered the same way (for example, in my example spritesheet the left position is below the front-facing position). In this case, the simple (and best) solution was to simply use a gradient to remap our [0, 1] angle value as appropriate. To note: for some reason, my gradients get cleared frequently in shadergraph so make sure to save yours, or expose a texture field for your gradient. You can set the remap angle value on any field (I used the R value of my gradient for the remapped angle values).
Then, I added “movement” to the shader, which is simply adding a time-based offset to the x value of our tiling and offset node.
I also added a property isMoving to the shader to enable/disable this movement.
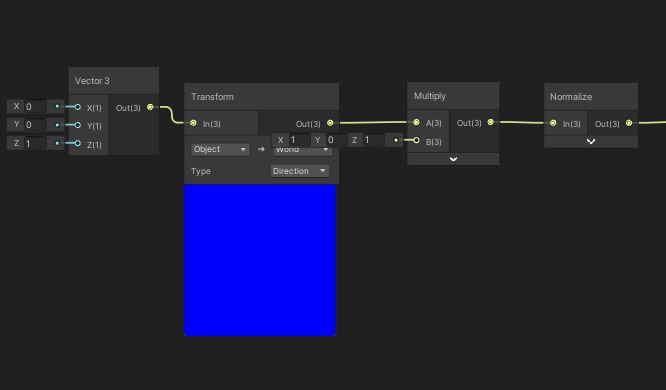
Finally we needed to get the object forward to adjust our sprite selection. I didn’t manage to find any information on the topic, but the most obvious solution was to simply get the object-space forward vector (0, 0, 1) and convert it to world-space. Then we set the y value to 0 to easily check the current orientation of our object and get the suitable sprite. Basically, we use the current orientation to get an offset to be added to the angle value previously found. We also use a fraction node to ensure we stay in the [0, 1] values.
This is pretty much the same as what we did with the angles in the first article, except this time I didn’t use angles. There’s no real reason for it, using angles and remapping via a gradient could be much cleaner, you could also stack the 2 gradients in a single texture.
Here’s the result:
As expected, the sprite not only changes depending on camera position relative to object position but also reacts to changes in the object forward. The result is pretty good, and I’m hoping to create a nice demo scene before releasing the final version!
This project has a github repository, feel free to check it out!