How to set up Object Eye Tracking for a 3D model in Unity - Part 2
Published
In Part 1, we created a script to make our model track an object with its eyes. In this next section, we’ll now improve on the first part of our tutorial, fix some issues related to texture wrapping, and improve the tracking calculations, instead of simply using target local position.
These improvements to our Eye Tracking system are simple, but you’ll see: they add a lot to what we currently have!
Change Texture Wrap Mode
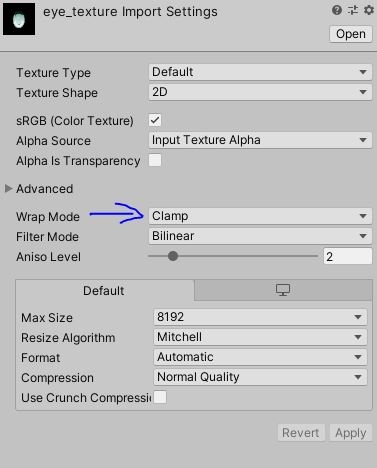
Our first tip is to change the import settings of the pupil texture. By default textures are import with Wrap Mode set as repeat. This is usually good, but in this case, this means that once the offset of our texture is too high, the texture will repeat itself.

This an easy fix: we’ll just change the texture import wrapping mode. Just select the pupil texture and set the “Wrap Mode” setting to Clamp. This will prevent the texture from repeating when is offset is too large.
Preventing Fully White Eyes
Now that our pupil texture does not warp, we’ll be adding some constraints on the offset applied to our materials.
This is necessary since, when the offset is high (or low) enough, the pupil is completely hidden, leaving only empty eyes. While this could be useful in some cases (maybe zombies?), this is highly unnatural for a normal character and we want to avoid it.
So, let’s go back to our EyesTracking script and add the following properties:
  [Header("UV Wrapping")]
  public float mMinX = -0.2f;
  public float mMaxX = 0.2f;
  public float mMinY = -0.15f;
  public float mMaxY = 0.2f;
With this, we are adding constraints to the eyes so that the pupil is always visible. I gave some default values which worked well with my model, but you’ll to fit it to your own.
Now we need to take these constraints into account in the Update section:
void Update(){
  Vector4 offset = new Vector4();
  offset.x = transform.localPosition.x;
  offset.y = transform.localPosition.y;

  if (offset.x > mMaxX)
  {
    offset.x = mMaxX;
  }
  else if (offset.x < mMinX)
  {
    offset.x = mMinX;
  }

  if (offset.y > mMaxY)
  {
    offset.y = mMaxY;
  }
  else if (offset.y < mMinY)
  {
    offset.y = mMinY;
  }

  // set material offset
  mRightEyeMaterial.SetVector("Vector2_DDB245C2", offset);
  mLeftEyeMaterial.SetVector("Vector2_DDB245C2", offset);
}
Setting a Default Eye Position & Enforcing Minimal Target Distance
These 2 points are linked together: it doesn’t make sense for the eyes of our model to track an object that is behind it. We therefore need to set up a default offset in case the depth (distance on the z-axis) is too low or negative.
We’ll just add the corresponding properties, and perform a check in Update.
public Vector4 mDefaultEyesPositions = new Vector4(0f, 0f, 0f, 0f);
public float mMinDepth = 0.25f;

void Update() {
  if (transform.localPosition.z <= mMinDepth)
  {
    offset = mDefaultEyesPositions;
  } else {
    (our previous code)
  }

  // set material offset
  ...
}
See how the pupils spring back to the default position when depth is too low.
Here we only check for depth but you can also check for minimum/maximum distance.
Better Offset Calculations
We have corrected several issues already, but this is the biggest one: the pupil movements are too sensitive to movements in the target. This is because our Offset calculations are not taking into account the distance on the z-axis, aka depth. We’ll modify our offset calculations to add some (very basic) trigonometry.
First we’ll seperate our offset into the x and y parts of it, for simpler computations. Now we can consider the distance between the eyes and the target itself not as a straight line, but as a triangle, as seen below.
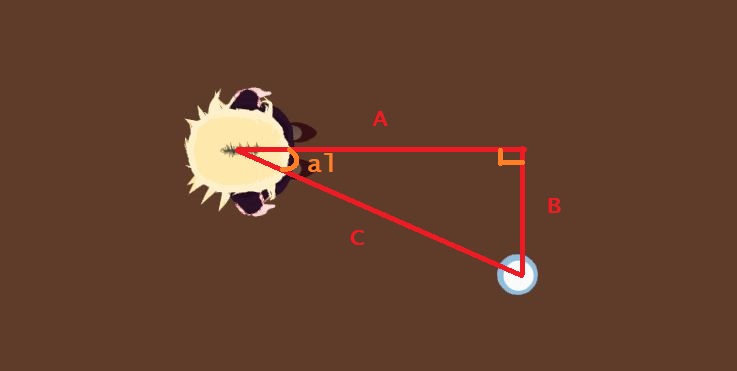
This is where trigonometry comes in. If you remember your mathematics classes, or just trust me, you’ll know that tan(alpha) = B / A
So why do we bother calculating this? By considering point of Origin in Head of model, we can draw the following projection:

Now we can do the computations in reverse with this new triangle, which gives us: tan(alpha) = B’ / A’ B’ = tan(alpha) * A’
Since we know both the distance from the center of our head to the eyes, and the previous step gave us tan(alpha), we can now compute the X offset of our pupil, which is equal to B’.
We’ll operate in the same way for computing the Y offset. Pretty simple right? But the result is quite nice.
Here’s the code:
  // add this property, the distance between the center of the head and the eyes
  public float distanceCenterHeadToEyes = 0.3f;

  ...

  void Update() {
    ...

    Vector3 localPos = transform.localPosition;

    // Computing offset on X axis
    float tanB = Mathf.Abs(localPos.x) / (localPos.z + distanceCenterHeadToEyes);
    _mOffset.x = distanceCenterHeadToEyes * tanB;
    // adjusting for offset sign
    if (localPos.x < 0f) {
    _mOffset.x = -_mOffset.x;
    }

    // computing Y axis offset
    tanB = Mathf.Abs(localPos.y) / (localPos.z + distanceCenterHeadToEyes);
    _mOffset.y = distanceCenterHeadToEyes * tanB;
    if (localPos.y < 0f) {
      _mOffset.y = -_mOffset.y;
    }
    _mOffset.y = -_mOffset.y;

    ...

    // Previous code here: check if offset respects min values
    // and then set offset to material

  }
With this, we are done!
Actually the computation for the pupil offset should differ somewhat between the 2 eyes, but considering the distance between the center of the head and the eyes is pretty small this can be safely ignored and will still look good.
You can also play around with the distance value between the center of the head and the eyes to control how fast the pupils move with the target displacement. A value between 0.2 and 0.4 works should work pretty well!