Mastering Unity Packages to enable a seamless workflow
Published
What is a package in Unity
A package is a collection of code, assets, and resources bundled together for distribution and reuse. It is a self-contained unit that can be easily shared, installed, and integrated into various projects.
In the case of Unity, packages are used to encapsulate scripts, shaders, prefabs, textures, and other assets, making it easier to reuse and share functionality between different Unity projects.
Unity embraces this workflow by providing a dedicated Package Manager, with a visual interface, in its Editor. This allows you to import packages from a variety of sources, including Github and the Asset Store.
Why you should use packages in your Unity workflow
There are several benefits to using packages. These include:
- Code reusability. Packages encapsulate your resources and allow you to share them between projects
- Dependency management. Packages can define explicit dependencies to other assets / packages so that they get imported as well
- Simplifying collaborative workflow. Teams are able to share custom tools, frameworks and utilities seamlessly
- Version control. There are a lot of moving parts in game development and testing is an harduous task; version control helps isolate errors
- Testing. Packages can contain tests using the Unity Test Framework (previously called Unity Test Runner), or unit tests based on NUnit.
While it may seem a bit much for indie developers or small teams, I personally think it’s a very useful workflow. It’s quite common to have repeated code and assets between projects (such as map generation algorithms, noise functions or even assets and prefabs).
Instead of copying and pasting code around, this enables you to easily have a clean environment with the added benefit of making improvements to a library instantly available to all projects depending on it.
How to import a Unity package from Github
The Unity Editor provides a convenient Package Manager, which allows you to easily import packages from a variety of sources:
- Unity Registry
- Asset store
- From your hard drive
- From git repositories
In this case, we want to import a package from github. First we can open the package manager window by clicking “Window” then “Package Manager” from the top menu.
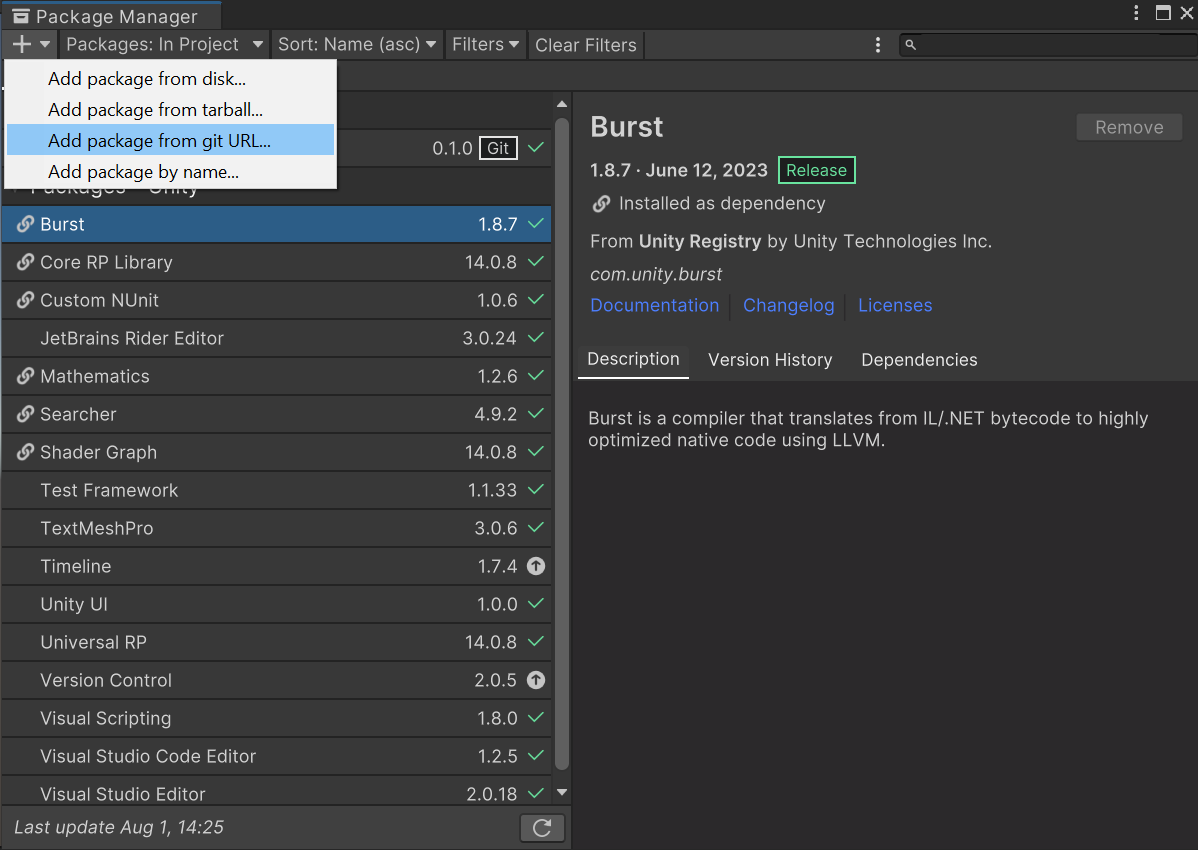
Once the Package Manager window is open, you can click on the ”+” icon in the top-left corner, select “Add package from git url” and use your target package url.
Make sure you’re using a valid URL! For example some of our algorithms for map generation are available as a package on github on the following page https://github.com/NoveltechOrg/MapGeneration.
A valid URL to import it in Unity using the process described above requires the .git extension, so the link would be https://github.com/NoveltechOrg/MapGeneration.git
How to update or remove an imported package in Unity
If you’re dealing with a package imported from a git URL, the process is simple:
- Open the package manager window
- Select the package you want to update or remove
- Click the update or remove button depending on your needs as shown below

If you’re dealing with a .unitypackage file, you’ll have to manually delete the imported assets.
- In the explorer, find the package folder that was imported
- Right-click and delete from the context menu
How to set up your own Unity packages on Github
Distributing Unity packages on Github allows your team members to work independently, and makes it simple to import and upgrade dependencies. It can even support large files if you’re using Git LFS (LFS stands for Large File Storage).
To distribute your package successfully, you need to set it up properly. There are two key elements to pay attention to:
- Creating a
package.jsonfile - Organizing your folders in a special manner
How to set up your package.json file for your Unity Package
A package.json file is needed to allow github to recognize the repository as a package
So, what information do you need in your package.json file? Here’s a sample to help guide you:
{
  "name": "com.example.mypackage",
  "version": "1.0.0",
  "displayName": "My Package",
  "description": "This is a sample Unity package.",
  "unity": "2021.3",
  "dependencies": {
    "com.example.someotherpackage": "1.2.3"
  },
  "keywords": ["unity", "package"],
  "author": {
    "name": "Your Name",
    "email": "you@example.com",
    "url": "https://www.example.com/"
  }
}
You can see that the naming of the package follows convention, with the format com.COMPANY_NAME.PACKAGE_NAME.
Please note that there a lot of fields that can be added to this file, but most of them are facultative and there are only 2 required properties:
- Name of the package. This name starts with
<domain-name-extension>.<company-name>according to the convention, so for example if your domain is a .io domain, your package name would start with “io.my_company” and followed by the actual package name. - Version of the package
It's a good practice still include the following recommended properties: - Package description, with the key "description". This helps users know what use the package is intended for - Display name, with the key "displayName". The domain name plus company name convention is a bit unwieldy to read, so adding a human friendly is definitely a plus - Unity version, with the key "unity". Again, very important as Unity releases plenty of versions, and your package is not guaranteed to work on older or even newer versions of the editor, so this helps find versioning issues. This only requires major and minor data, such as "2022.3"
You can find details on all fields for this file on the Unity documentation website.
You can also look at sample package.json file that we use in production from one our repositories. Here’s the package.json file for our MapGeneration repository.
Organizing your package folders
Properly organizing your package’s folders is crucial, especially for Editor files. Unity follows a specific layout convention for packages to ensure consistency and compatibility.
The documentation website for Unity has a section on how to organize your package layout, which provides an example for your folders’ layout:
<package-root>
  ├── package.json
  ├── README.md
  ├── CHANGELOG.md
  ├── LICENSE.md
  ├── Third Party Notices.md
  ├── Editor
  │   ├── <company-name>.<package-name>.Editor.asmdef
  │   └── EditorExample.cs
  ├── Runtime
  │   ├── <company-name>.<package-name>.asmdef
  │   └── RuntimeExample.cs
  ├── Tests
  │   ├── Editor
  │   │   ├── <company-name>.<package-name>.Editor.Tests.asmdef
  │   │   └── EditorExampleTest.cs
  │   └── Runtime
  │        ├── <company-name>.<package-name>.Tests.asmdef
  │        └── RuntimeExampleTest.cs
  ├── Samples~
  │        ├── SampleFolder1
  │        ├── SampleFolder2
  │        └── ...
  └── Documentation~
       └── <package-name>.md
The required folders organization is quite straightforward: put the package.json file at the root and create relevant folders to put code, assets and tests.
Looking at the previous example, you can see that some folders have a tilde ~ appended to their names. This tells Unity to ignore the given folder and not track it.
We can also see that some of these folders have files for asm definitions. While this is not explicitly required for the Runtime folder, asm definitions are a good practice. It is different for the Editor folder though: as we mentioned in our article on fixing CustomEditor errors, scripts using the UnityEditor asmdef must not be integrated when building a game. Creating an assembly definition file allows us to ensure that the Editor scripts won’t be used when compiling our game and enable us to avoid build issues.
Once again, you can take a look at some of our repositories to see an example of Package set up.
Finally, once you’ve properly set your package you can push it to github, and then import it from another project and see if it works!
One last tip: if you encounter issues while importing a package, and the error message is not very helpful, you can actually change the log level for the package manager.
Changing the log level for the package manager is simple:
- Open up the “Preferences” window. From the top menu, click on “Edit” then “Preferences”.
- Go to the “General” section
- Set the “Package Manager Log Level” to a value that will make it give more details, such as “Verbose”, “Debug” or “Silly”.