Dungeon Diver - Basic Movements - Part 2
Published
Here comes the second part of our movement system implementation. In the first part, we already made a working movement system based on Keyboard inputs.
Still, we haven’t decided yet on which platform we would like to release our game, maybe we would like to play on mobile in which case we won’t have a keyboard. Luckily, this is easy to implement, and making a visual system for movements seems like a real good way to get introduced to creating reactive elements in our games. So, let’s see how it’s done!
Remark: For more advanced buttons control, such as radio buttons, check out my Buttons Group repository on github.
To see this system in action, click on the demo link above.
All necessary resources are available on github.
User Interface means using a Canvas
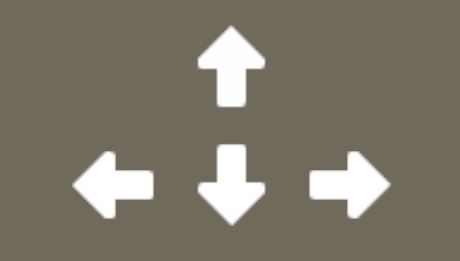
Our intent is to create a simple visual controller for our game, and I decided to use something like the following:
Visual elements like an image or a button are displayed by using a “Canvas”, which is quite often the preferred solution for menus, buttons or information displays. So, go right ahead, right click the hierarchy of your scene and create a new Canvas. Unity should create your canvas object, as well as an EventSystem game object, that will take care of detecting clicks, hovers and other events occurring on your UI.
Unity Buttons
As I explain in my article Why I chose Unity for Game Development, Unity has a lot of features built-in. Buttons are one of these, so go ahead, right click your canvas -> UI -> Button.
And voila, you’ve got a button game object, that’s convenient! Click on the button gameobject to bring it up to the inspector. You will see that the button gameobject has a component Image, with a Source Image field. Change the Source Image to use our arrow, and resize the button as necessary (the Rect Transform component).
Now I want you to take a look further below at the OnClick section of the Button component. This is what allows you to easily interact with other elements in your game. Click on the little ”+” symbol, below “RuntimeOnly” select your player gameobject and then on the right choose the function MoveForward of its PlayerController component.
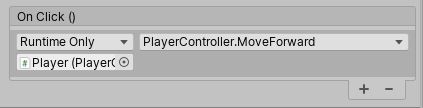
Start up the game (play button at the top of the screen, or Ctrl+P): now everytime you click on your arrow button, the player should move forward. That was easy right?
Well, not so much actually. If you take a look at the onclick element of your button, you can’t see the Rotate function, why?
The Unity Button is great, but has 2 major limitations:
- it can only call methods which take 0 or 1 parameter
- no support for functions using user-specified types
In our case, we pass an enum value to the Rotate method, so it cannot be directly set in the inspector of the Button component.
There are 2 solutions: either don’t use enums (you should use enums when possible), or…
Create your Buttons from Scratch
My preferred solution.
Once again, Unity has already implemented most of what you need, so we do not have any problem creating a Clickable element.
To create our button logic, we will create a new script, ClickableArrow.cs, which will contain our ClickableArrow class. This class inherits from MonoBehaviour, so that we can set it as the component of an object, but also implements “IPointerClickHandler”.
This IPointerClickHandler is what is called an interface. An interface is basically a contract: by saying that your class implements this interface, it means your class will implement specific functions with specific signatures (input and output types). This is what will handle the click event for us so that we don’t have to do it ourselves.
Now, put the code below in your ClickableArrow file.
using UnityEngine;
using UnityEngine.EventSystems;

public class ClickableArrow : MonoBehaviour, IPointerClickHandler
{
    public Directions ArrowDirection;

    private PlayerController _PlayerController;

    void Start()
    {
        _PlayerController = GameObject.FindGameObjectWithTag("Player").GetComponent<PlayerController>();
    }

    public void OnPointerClick(PointerEventData eventData)
    {
        // OnClick code goes here ...
        if (ArrowDirection == Directions.Forward)
        {
            _PlayerController.MoveForward();
        } else
        {
            _PlayerController.Rotate(ArrowDirection);
        }
    }
}
Nothing too hard right?
What we’ll do now is create a new Image object in the scene (right click your Canvas => UI => Image). Now change the source image to an arrow, and add your ClickableArrow script as a component of your image object. This ClickableArrow has an ArrowDirection field which you will need to set in the inspector. For all 4 directions (left, forward, right, backward), create an image, rotate it and set the direction.
Now try to run the game: if your player responds correctly to your inputs, that means you managed to implement your own custom buttons, and create a player controller that can be used on both mobile and desktop. Congratulations!
What’s Next?
Right now, our player can move and while that’s fun, our game world seems a bit empty. Our next stop will therefore be to add walls to our game and create a maze: no dungeon can be considered good if the player doesn’t get lost a little, right?
As a side note, while I emphasize the fact that a game developper should first focus on gameplay system before visuals, you might find the arrows a bit lacking as reactive elements: they don’t even change colors! Well, fear not, you can always check out my great repository on Buttons Group to see how you can implement hover and color changes for your buttons. The repository is Open Source so feel free to drag and drop the elements directly in your project and play around with it!